Let’s learn how to perform a bank reconciliation in Dynamics Business Central. Bank reconciliation is a critical aspect of business accounting, helping you to ensure that your bank statement matches the transactions recorded in your accounting system. Performing regular bank reconciliations in Microsoft Dynamics 365 Business Central can help you stay on top of your financial transactions, identify discrepancies and reconcile them quickly, accurately and efficiently. In this article, we’ll take a closer look at the steps involved in performing a bank reconciliation in Business Central.
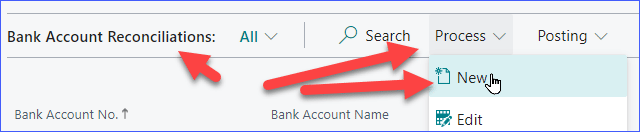
Step 1: Navigate to the Bank Reconciliation Page To get started with bank reconciliation in Business Central, you need to navigate to the Bank Reconciliation page, which can be found by going to the Search bar and typing ‘Bank Reconciliation’. Once you’ve located the page, click on it to open the Bank Reconciliation page.

Step 2: Select the Bank Account to Reconcile On the Bank Reconciliation page, select the bank account you wish to reconcile from the dropdown list of bank accounts available in your Business Central system.
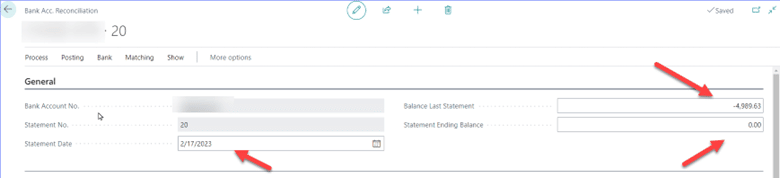
Step 3: Enter the Bank Statement Information To begin the bank reconciliation process, you need to enter the statement information from your bank statement. This information includes the bank statement date, the closing balance, and the bank statement ending date. You can enter this information manually, or if you have a file with this data, you can upload it to Business Central.
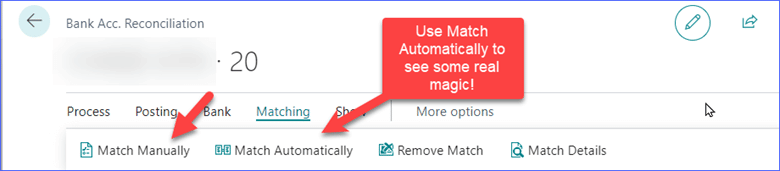
Step 4: Match Transactions Once you have entered your bank statement information, you need to match the transactions on your bank statement with the transactions in your Business Central system. You can do this by using the Match function, which compares the transactions in your accounting system with those on your bank statement. Business Central will automatically match any transactions that have the same amount and date. You can also manually match transactions if they haven’t been automatically matched by the system.
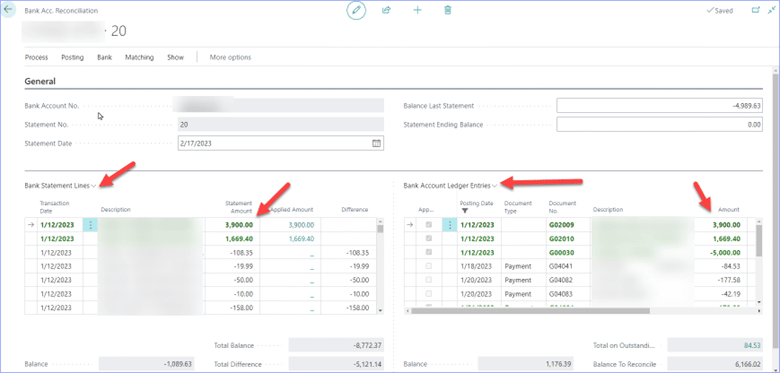
Step 5: Reconcile Discrepancies After you have matched all the transactions, Business Central will show you a Reconciliation Summary page that displays any discrepancies between the transactions on your bank statement and the transactions in your accounting system. If you notice any discrepancies, you need to reconcile them by adjusting the transactions in Business Central to match the bank statement. This will ensure that your bank statement and your accounting system are in sync. You can adjust transactions by using the Process and Transfer to General Journal but at present it is better to exit the reconciliation and then enter the transactions manually, go back in to the reconciliation and match them up.

Step 6: Post Reconciliation Entries Once you have reconciled any discrepancies, you need to post the reconciliation entries to finalize the bank reconciliation process. This will update your general ledger with the reconciled transactions, which will help you ensure that your financial records are accurate.
In conclusion, bank reconciliation is an essential process in business accounting. By following these steps, you can perform a bank reconciliation in Business Central quickly and efficiently. Regularly reconciling your bank accounts in Business Central can help you stay on top of your finances and make informed business decisions.
Contact Aisling Dynamics for help or to learn more about Business Central
Or Follow Us on LinkedIn to learn more!
Top of Form