Between part 1 and part 2 we will be showing 14 tips and tricks to aid in BC productivity and ease of use. These are our 7 Business Central Productivity Tips and Tricks Part 1
Here is what we are covering in this Blog
These are our 7 Business Central Productivity Tips and Tricks Part 1
- Using Analysis Features
- Quickly Pay Vendors
- Collections Tips
- Copy and Paste From Excel
- Edit in Excel
- Use Outlook Plugin
- Searching and Filtering Data
Using Analysis Features
Analysis Features allow you to Pivot data in lists within BC to report on what you need to report on or research.
Analysis Features sometimes need to be turned on in Feature Management use your lookup and enter “Feature Management”, find the feature and enable it. It updated instances of BC it should already be enabled.
As an example, I see the Analyze Button at the top of lists that it is available on, such as General Ledger Entries:
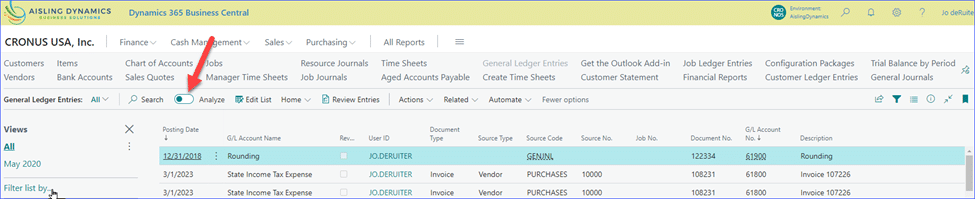
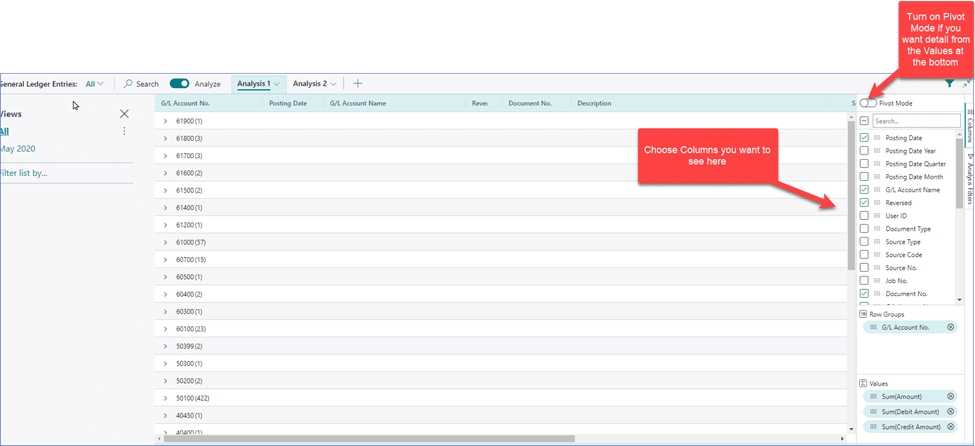

As you can see, this is a valuable research tool
Quickly Pay Vendors
For a listing of vendor invoices currently due, you have two options, well several options, but these are my favorites:
- Pull up the list “Vendor Ledger Entries”
- Filter to a due date and grab all that are prior to the date you want, such as >01/31/2024 which would return all invoices and credit memos due before 01/31/2024.
- For a list of search wildcards for filtering see the section below on searching and filtering data
- OR you can filter on the ‘OPEN’ column to Open = YesSAVE your filters so you can easily get back to this – see Searching and Filtering Data below to learn how.
- Filter to a due date and grab all that are prior to the date you want, such as >01/31/2024 which would return all invoices and credit memos due before 01/31/2024.
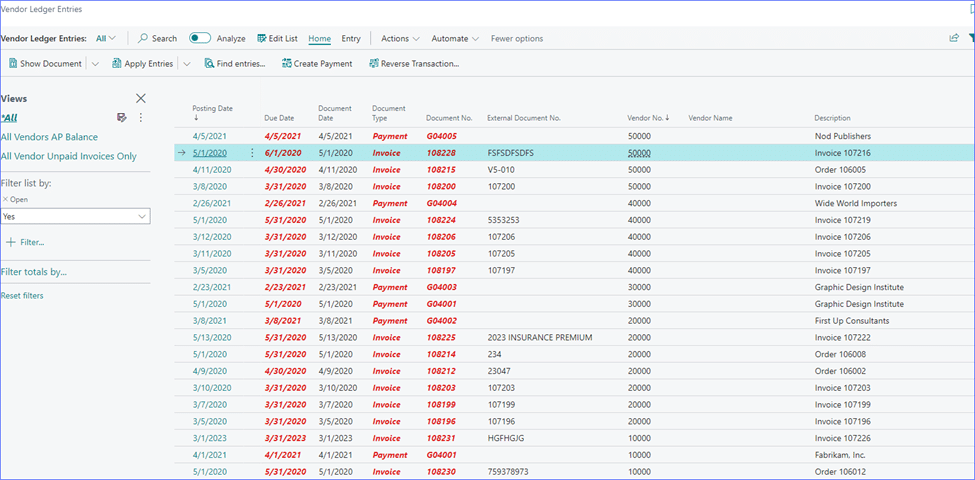
- You can also simply click on Outstanding Vendor Invoices KPI on the homescreen – you can see this when your Role is Business Manager

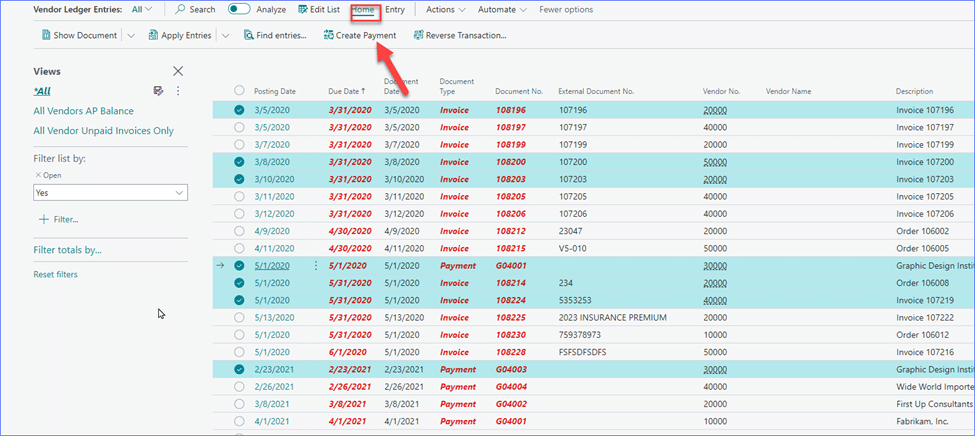
Now that we have our list, we can generate and setup the payments quickly.
To do this, use the three dots after the first column and choose “Select More”
Now, simply mark the invoices you or the approver has agreed to pay, you can even mark the credit memo and unapplied payments so you get exactly what you owe the vendor
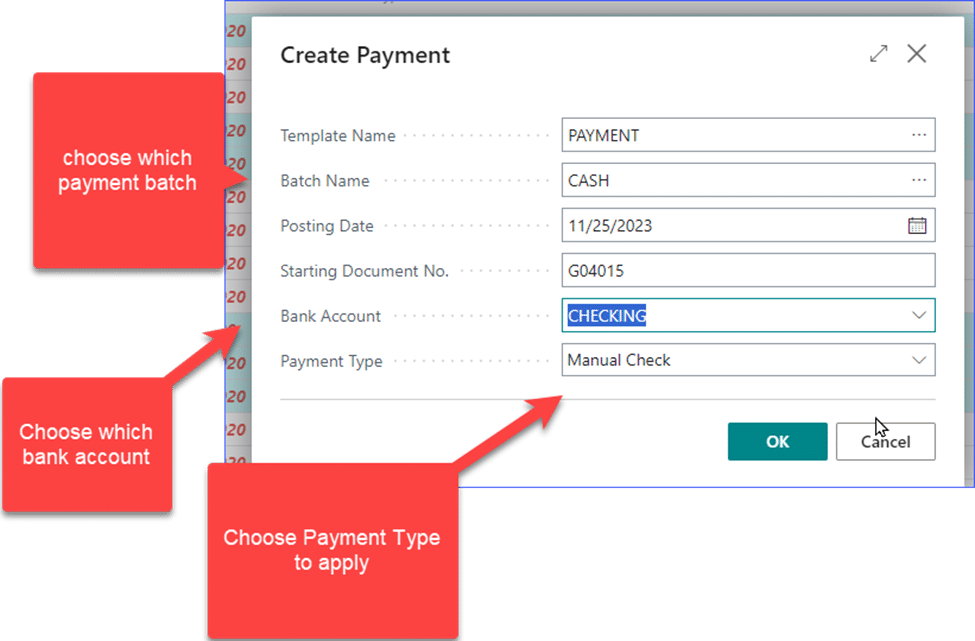
Click ‘Create Payment” and this will setup this payment in Payment Journal, whichever bank you choose during the Create Payment phase and all of the payments are setup and applied to the invoices, credit memos or payments you have chosen – netted into one check
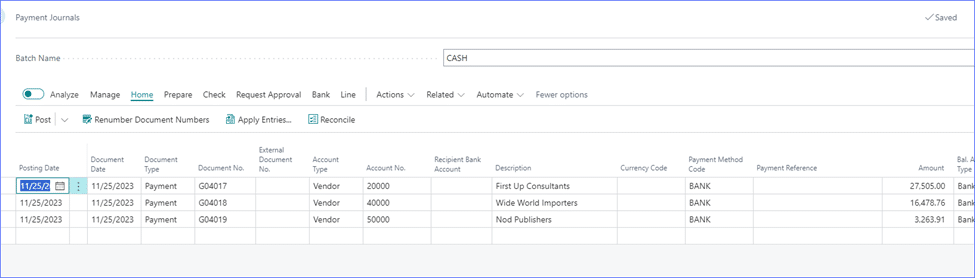
You can now see under apply that the payments are applied to the documents I chose in the previous step and all that is left to do is print the checks or process the EFTs or manual checks and then post the batch and you are done!
Collections
Like Vendors, Customers also have a “Customer Ledger Entries” list which can be filtered to what is past due or what is due. If your Role is Business Manager you even have an Overdue Sales Invoice metric on the home screen that you can drill into to see who is now past due. Otherwise, go to Customer Ledger Entries and filter to what you want to see.
In the Customer Ledger Entries List you can filter to anything due before a certain date, where Remaining Amount does not equal zero and the Open status is ‘yes’.
Sort by customer and highlight the customers you want to communicate with. You can create a reminder and charge finance charges all from here. There is basic setup to Reminders and Finance Charges, Steve Chinsky has a great blog on this located https://dynamicscommunities.com/ug/dynamics-business-central-nav-ug/managing-receivables-in-business-central-setting-up-customer-reminders/ .
These reminders serve as specific communication on all invoices, credit memos and payments that are outstanding as of the date.
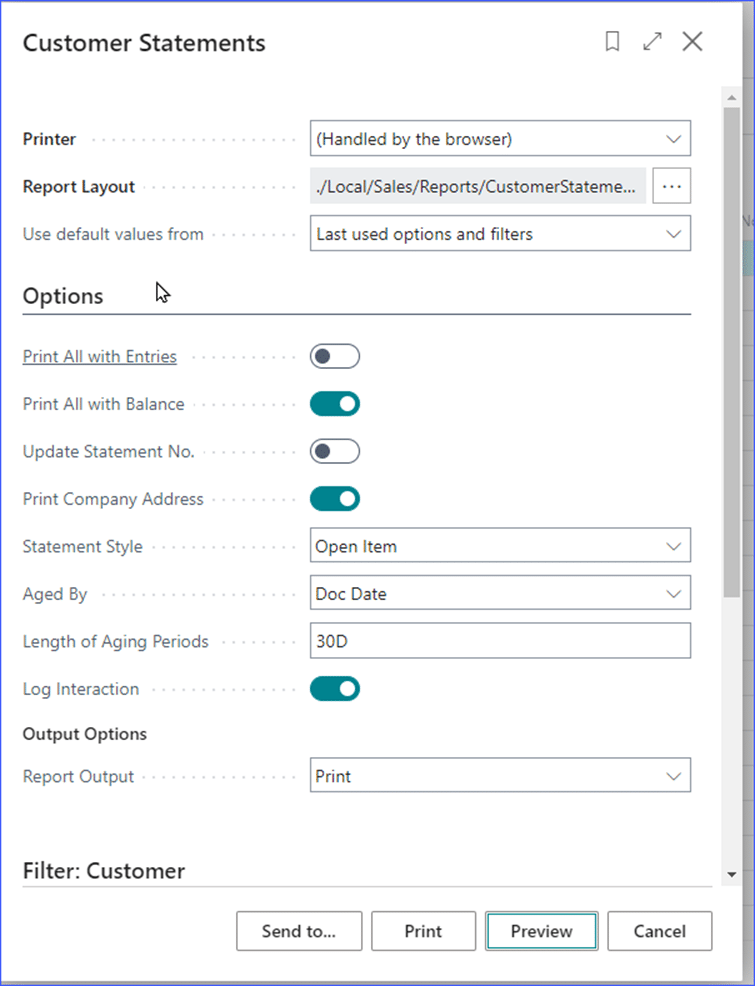
You can also send statements and schedule statements to run, there are two statement areas, Customer Statement and Customer Statements – they produce different reports so try each of them before you decide on a format – you CAN alter the format the same as most reports in Business Central.
I prefer “Customer Statements” because the report tends to display a little more easy to read. You have a lot of control here:
Fore much more on collections, check out Microsoft Learn here: https://learn.microsoft.com/en-us/dynamics365/business-central/receivables-collect-outstanding-balances
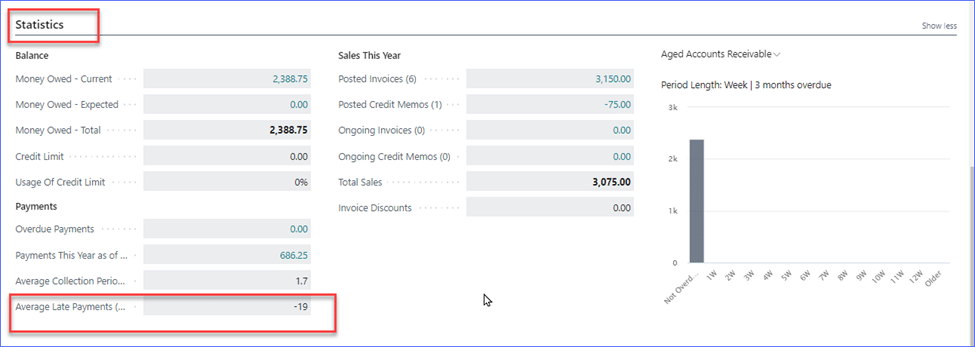
More information about a customers payment history can be found in their Customer Card. I can see clearly that this customer routinely pays me negative 19 days – in other words, usually pays me 19 days early. Here is where I can see and report on credit usage, etc.
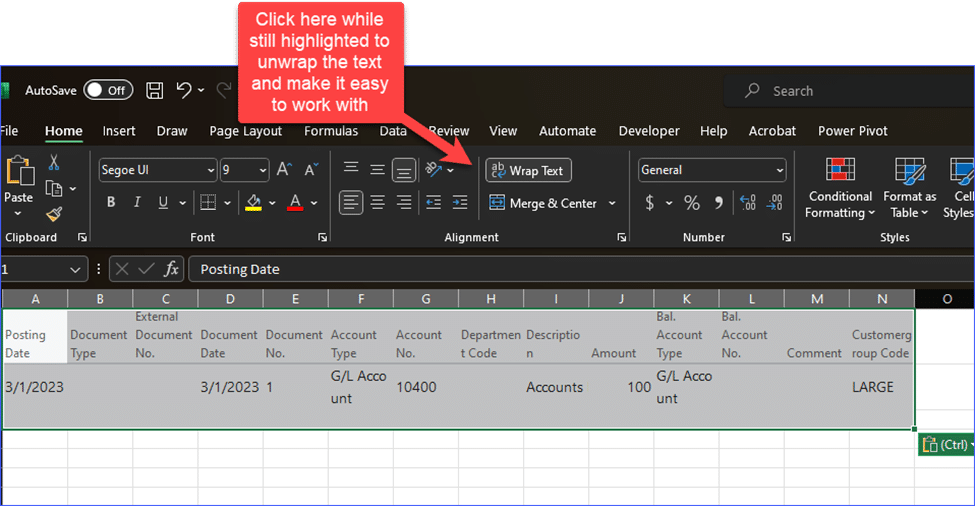
Copy and Paste From Excel
There are a number of ways to integrate with Business Central and get transactions and records loaded quickly. One of the most end-user friendly is the copy and paste functionality from Excel.
Couple of caveats:
- The format of the copy and paste is completely dependent on the columns on the end-users screen and no other end user. Therefore, if you have users who have each customized their fields and screens then the copy and paste one user uses will NOT work for another user.
- You cannot rearrange anything from the copy and paste fields – the best way to ensure success is to enter one row of data by hand and the use CNTRL-C to copy that row and then use CNTRL-V to paste it into Excel – you now have the complete format you can use to copy and paste – I recommend this being the very first step in copying transactions in order for you to have greater success during the paste into BC
Here is how to copy and paste a Journal Entry (bear in mind you can copy and paste into ANY lines of ANY transaction)
- In the transaction, be on the LINES section of the transaction and on the first line hit your control key and your C key CNTRL-C to copy a line
- Open Excel and hit CNTRL-V to paste or right-click and choose to paste.
- Copy down all data in each column – change nothing but the data area and use only existing records like accounts or items or vendors or customers, etc.
- It will error if the record does not already exist.
- Highlight all the data area – no header area at all – so no column headers
- Copy just the data by hitting CNTRL-C or right click and copy
- Bank in Business Central use the three dots and delete the existing line in order to paste on that line of data – otherwise, if you want to leave that line go to the next line and click on the arrow (it won’t do anything, but click here for best success)

- Now, all you need to do is complete the transaction by posting or edit it a bit and then post.
Edit in Excel
Edit in Excel is another form of integration and mass-change for transactions. Edit in Excel will allow you to move the transaction to Excel and finish it there then publish it back up to Business Central.
You will need to install the tool for connecting to Business Central you can find it here on Microsoft and App Source https://learn.microsoft.com/en-us/dynamics365/business-central/admin-deploy-excel-addin
You must have permissions to the environment and to publish to it, but after that it’s kind of a piece of cake!
Let’s look at a Journal Entry again – though this method will work with almost all transaction lines. Not header – lines.
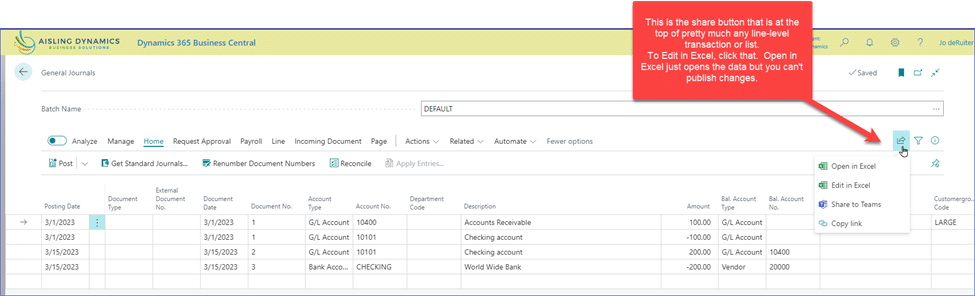
The transaction then opens in Excel for you to edit or add to and when done you publish your changes (note: sometimes you have to hit publish but you won’t see changes until you refresh your screen in BC.
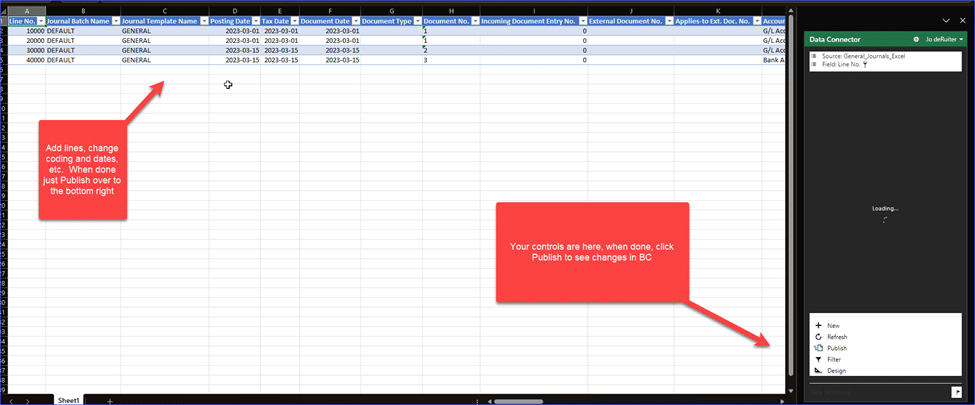
Try it out!
Using the Outlook Add In
Like Excel, there is a plugin for Outlook that can help increase productivity.
You can download and read about it here: https://learn.microsoft.com/en-us/dynamics365/business-central/admin-outlook
Be sure you’ve linked your customer or vendor emails to their master records in BC using Contacts.
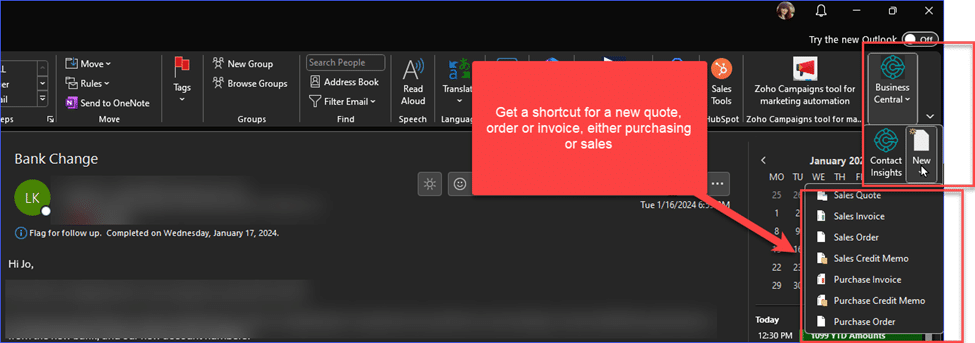
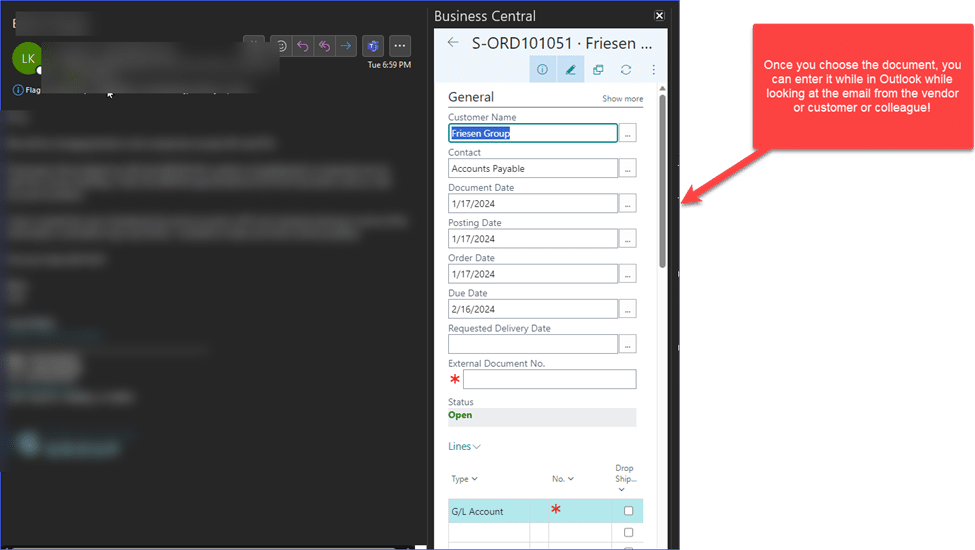
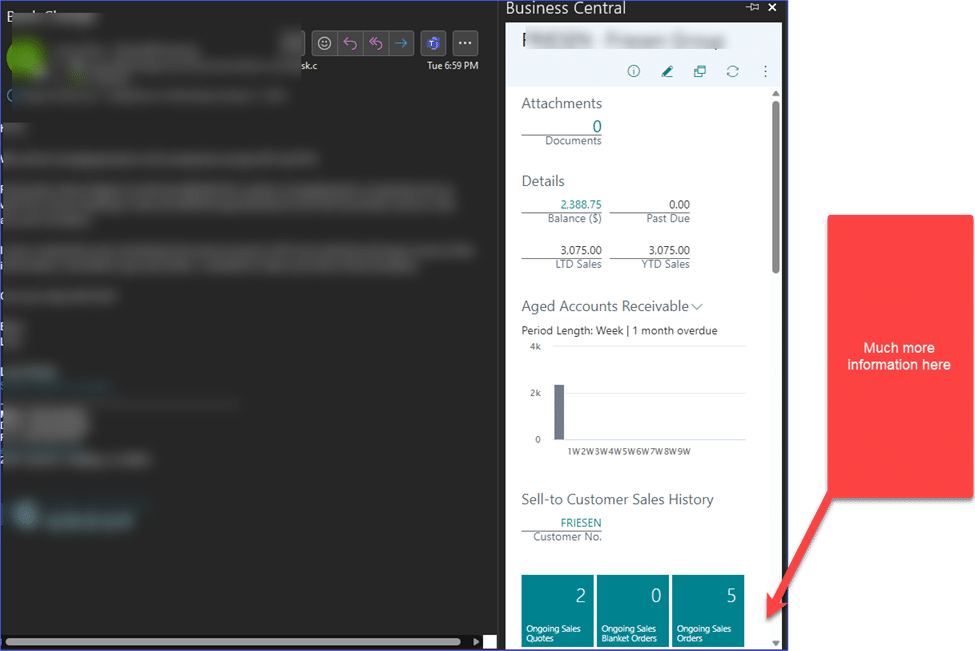
And, also handy for sales people are insights about the customer as well! – Same with Vendors
I choose Contact Insights instead of New in the plugin and I can see their attachments, their balances, etc. Here is a sample
Searching and Filtering Data
In Business Central, a ton of reporting can be done from Lists. Lists are prolific in Business Central. Here are examples of lists:
- General Ledger Entries (a most valuable reporting and research and correction spot)
- Posted Sales Invoices
- Customer Ledger Entries
- Vendor Ledger Entries
- Item Ledger Entries
- Purchase Orders
In other words you have the easy ability to quickly find anything you are looking for in order to research it or edit it.
Sorting
First, we’ll discuss sorting. In any list area you can sort by a column by clicking the header of the column – ascending and descending. This is an easy way to find what you are looking for if it is a small list.
Searching
To Search alone on the one criteria, find the ‘SEARCH’ field, generally at the top of the list, and type in the data you are looking for – but this provides just one criteria. If that’s all you need – this is the easiest way to search. Searching is generally NOT case sensitive.
This will help you find just about anything – for instance – in Posted Sales Invoices – use this to find all invoices for a customer by typing in the customer ID in the search box. To find a specific invoice, just type in the invoice number, etc. This search looks a many fields in the transaction but you may need to personalize your screen to see that field.
Filtering
At the top of a list is a filter button – like this:

Click it to green when you want to see the filtering views and click it to clear if you don’t want to see the filtering views.
To fine tune your search and filter results know that you can choose any column and type in or choose the criteria you want to search. An easy way here is to be on a record similar to all he records you want to see and use the ‘Filter to This Value’ in the drop-down at the column header.
The searching is sensitive, so if you are looking for a word value – like a specific description on the General Ledger Entry – then know that the filter IS case sensitive depending on how you search. So, the word receipt or Receipt can be found without worry of complication, but if you need to search based on case you can.
Here you can employ wildcards to replace aspects of what you are searching. For instance, I would use a pipe (|) to say ‘and’. As in I want to see transactions from accounts 1200 and 1300. In my filtering I would choose the column ‘GL Account’ and filter to those two accounts by typing in the filter 1200|1300 and boom – I have the transactions I’m looking for.
For a full list of wildcards please see Microsoft’s information here: https://learn.microsoft.com/en-us/dynamics365/business-central/ui-enter-criteria-filters
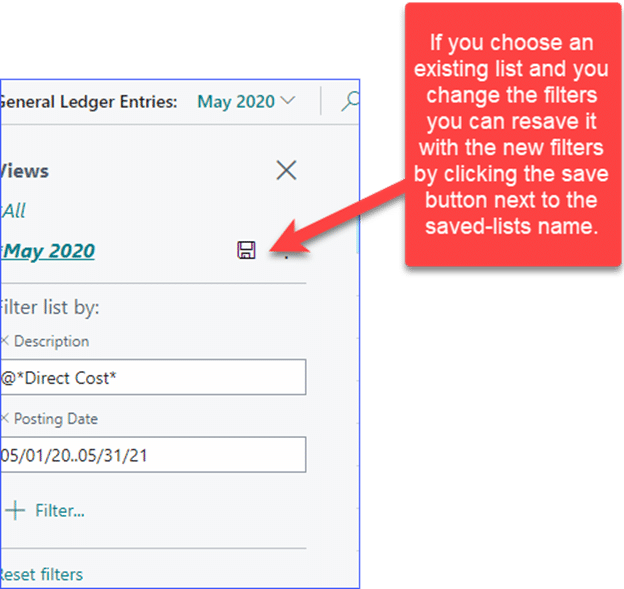
If this is a filtered list that you want to get back to then you can SAVE the filters
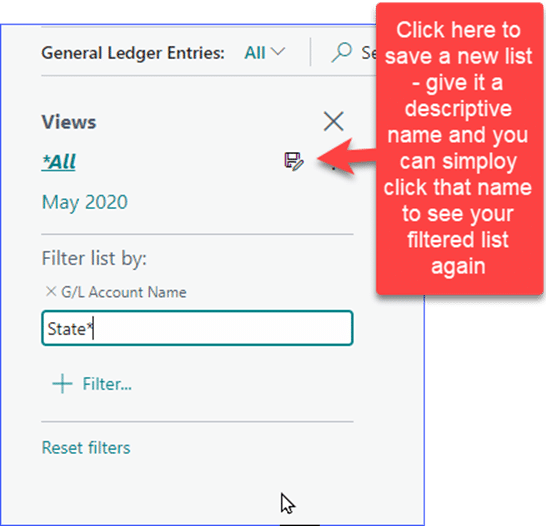
Once you have your filtered list you can shoot it out to Excel or perform any corrections you need to perform or are allowed to perform in that list.
And that was our 7 Business Central Productivity Tips and Tricks Part 1
Part two of our Productivity Tips and Tricks will be published soon – in that blog we will cover this:
- Data Entry Tips
- Use the Calculator in Numeric Fields
- Enter Dates with Keyboard Shortcuts
- Quickly Change Companies
- Attach Notes and Files
- Renumbering Master Records
- Correcting Entries
If you enjoyed this blog on These are our 7 Business Central Productivity Tips and Tricks Part 1 please share on LinkedIn or Facebook!
To contact Aisling for more assistance or to learn how we can help you be happy and successful with your ERP, go HERE